The Samsung Galaxy Nexus (read our full review here) is one of the easiest devices to root. That’s because it’s a Google Nexus device and was made that way. Nevertheless, if you’d rather not get into firing commands towards you shiny new smartphone, there is an app that will do everything for you.
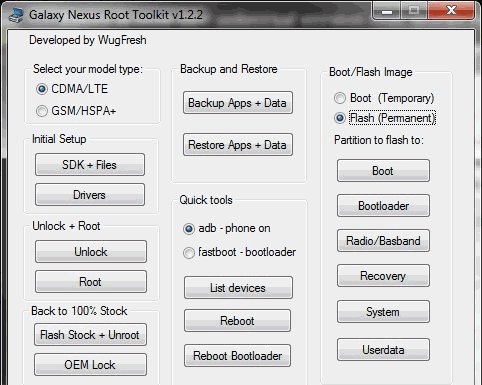
The ‘Wugfresh Galaxy Nexus Root Toolkit’ Windows-only application provides one-click unlock and root for both the GSM/HSPA+ and LTE flavors of the Galaxy Nexus. If you don’t have the Android SDK or the Galaxy Nexus driver installed it will install it for you. If you decide that root is not for you then the application offers one-click unroot and re-lock to restore it back to 100 percent stock.
You can also use the toolkit to backup all your apps and app data and restore them later with one click. Finally, you can use it to flash different images to the device.

To download the application, hear over here.
Here is a quick rundown on how to unlock and root the Galaxy Nexus without losing your data:
- Download and install the latest Wugfresh Galaxy Nexus Root Toolkit.
- Run the application and select between GSM or LTE (Verizon) models.
- If you do not already have the Android SDK installed (if you don’t know what it is then you don’t have it), hit the ‘SDK + Files’ button.
- Hit the ‘Drivers’ button – do it anyway as it won’t hurt if you already have them.
- Connect the Galaxy Nexus to you PC with a USB cable.
- Open an Explorer Window and copy all your Galaxy Nexus folders and files to your computer, wait until everything is copied over.
- Click on ‘Backup Apps + Data’ in the toolkit.
- Make sure you’ve done 6 and 7 above, as step 9 will wipe all your data — if it’s a brand new device you don’t need to worry about backing-up any data.
- Click the ‘Unlock’ button.
- Click the ‘Root’ button.
- To restore you apps and data, click ‘Restore Apps + Data’ with your device connected. Then using Windows Explorer copy back to Galaxy Nexus the folders you saved in step 6.


